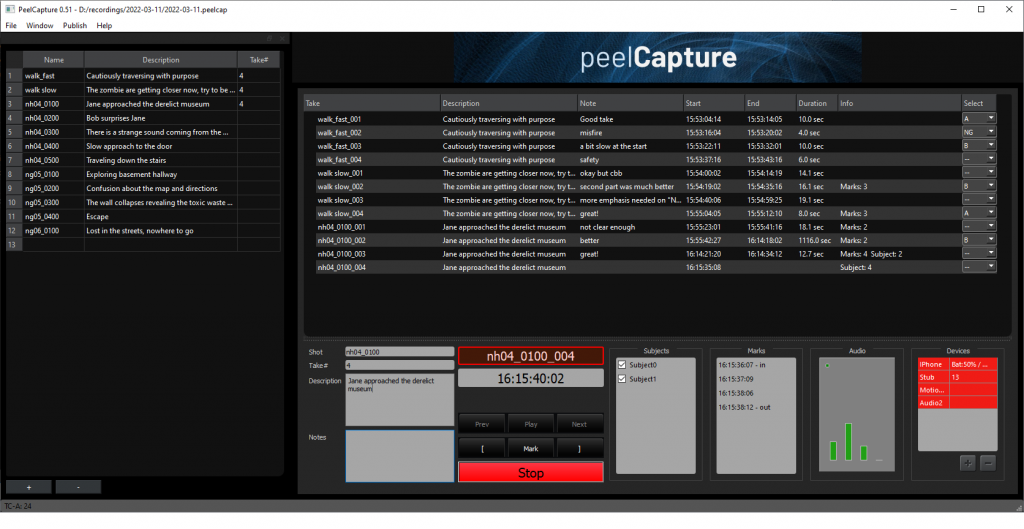
- Main Interface
- Recorded Takes Panel
- Take Details
- Shot List
- Transport Control Panel
- Subjects Panel
- Marks Panel
- Audio Panel
- Devices Panel
- EULA
Main Interface
- File
- New – Resets the takes to default, but remains in the same project/shoot
- New Shoot – Setup for a new shoot; naming the shoot and selecting the file directory for storage
- Wrap Shoot – finalizes and locks the JSON file for the shoot
- Load – Ability to load a CSV, .xlsx, .xls or .peeldev file.
- Reload – If you’ve loaded any of the above mentioned files, and then made an edit, ‘reload’ will refresh the file in PeelCapture without reimporting.
- Merge – Ability to merge an existing shoot into an past shoot
- Save – Saves your shoot progress
- Save As – Saves your shoot progress and rename your JSON file
- Export – Export your shoot data as a CSV
- Browse Data – Opens directory of stored files from shoot
- Settings – Opens General shoot, Audio, Timecode, Accounts, Shotgrid, FTrack, and Slate settings
- Recent > – Browse recently saved/open files
- Window
- Select which optional panels you would like to be enabled/disabled. All panels can be enabled/disabled except for the Take Details and Transport Control Panel.
- Publish
- Collect Files: Gather files from the multiple devices used in the takes.
- Publish (cont.)
- Peel Capture: Publish to Peel Capture Online (experimental)
- Shotgun: Publish to Autodesk Shotgun
- FTrack: Publish to Ftrack
- Copy Selects: Allows you to quickly copy only your ‘Selects’ to your file storage
- Help
- Documentation: Link to Documentation (this page).
- API Documentation: Link to API Documentation, found locally on the machine running PeelCapture
- About: Details about your current PeelCapture software.
- Check License: Check or modify your PeelCapture license.
Recorded Takes Panel
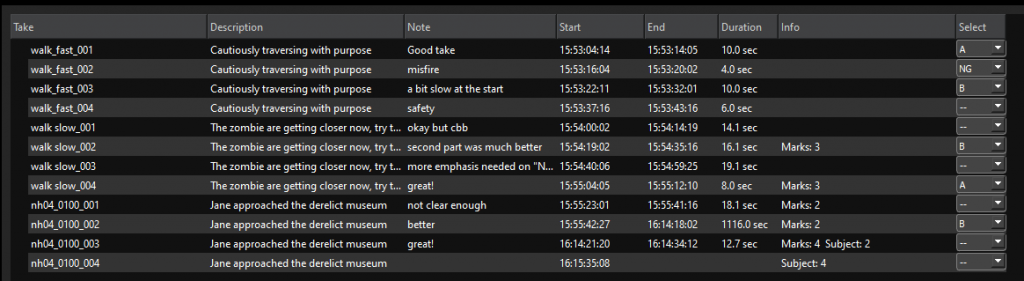
This table displays all the recorded takes for the shoot. This data can be exported as a JSON or CSV file using ‘File -> Save As’ or ‘File -> Export’.
Note: Saving in PeelCapture only saves the text/metadata information for the takes, not the mocap data itself.
Table fields Take, Description, and Notes are described under Take Details.
The other table fields are Start, End, Duration, Info, and Select:
Start and End – Starting or Ending timecode value in format hh:mm:ss:ms.
Duration – Total time of the take displayed in seconds.
Info – Summary of other information stored for the take; number of marks and number of subjects present.
Select – Record which is the A or ‘circle’ take, the B or ‘Alt’ and mark invalid takes as ‘NG’. These values can be modified in the Settings, under General Settings and editing the ‘Select’ field.
Shot List
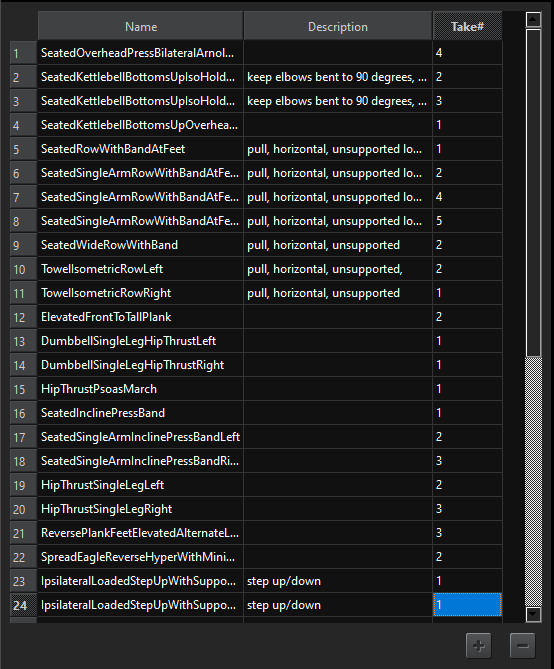
Load all of your shots into Peel Capture and never type your shot names during a shoot ever again. This supports manual input, copy/pasting a table, or loading a 2 column spread sheet via File → Load.
Simply click a ‘number’ on the left of the shot name to load your information into the take details. The number of takes per shot are recorded and each field can be edited during use.
If you need to add or remove rows from the shot list, there is a ‘+’ and ‘-‘ in the bottom right to adjust your list.
Take Details
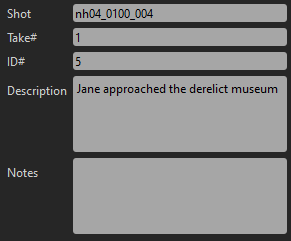
Shot: The name of the current shot.
Take#: The current take number. This number is incremented every take and combined with the shot name to make each take.
ID#: The current id number corresponding to the shot number. This will be iterated with every new shot name.
Description: The description of the current shot, usually determined before the shoot.
Notes: The notes for the current take, usually taken during or directly after the take is recorded.
Once a shot is complete and listed in the ‘Take’ window, you can double-click and edit any take details.
The shot and take# are used to generate the take name. See the transport panel section below for how these values are used.
Transport Control Panel
The current or next recording take name is shown in large letters at the top of the Transport Panel. This is not directly editable – the shot name and take number from ‘Take Details’ are used to populate this value.
To edit the formatting pattern that is used to generate the take name, double click on the current take name or open the General Settings in File -> Settings menu and edit the ‘Take Format’ field.
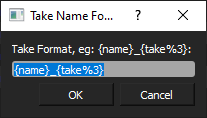
{id} – sequential id, increments throughout the day
{id%3} – take id, padded with zeros
{take} – the current take number, resets between shots
{take%3} – the current take number, padded with zeros
{name} – the current shot name
Note: Ki Pros do not support underscores, so they will be converted to hyphens on that device.

The current timecode is displayed under the current take. The timecode source can be configured in the settings. It may be read from an audio input, PC Clock, or Vicon data stream. When the operator presses “record” and “stop” the current time is recorded to the take.
There may be a delay between when the operator presses Record and when the device actually starts recording, so frame number in PeelCapture may not match with the exact same frame as the device records as the first frame, but it should be within a few frames.
The purpose of recording the timecode is for logging and can be used to reconcile issues after the shoot.
The transport controls, ![]() , can be used to playback previously recorded takes from some devices.
, can be used to playback previously recorded takes from some devices.
The mark controls, ![]() , allow the recording of marks during a take and are displayed in the Marks Panel. The left square bracket will note the timecode as a mark named “in”, and the right square bracket will note the mark as “out”. The “Mark” button will create an unnamed mark, which can be given a name if needed. An example would be to mark timecode for TPose to Tpose or “Action” to “Cut”.
, allow the recording of marks during a take and are displayed in the Marks Panel. The left square bracket will note the timecode as a mark named “in”, and the right square bracket will note the mark as “out”. The “Mark” button will create an unnamed mark, which can be given a name if needed. An example would be to mark timecode for TPose to Tpose or “Action” to “Cut”.
Subjects Panel
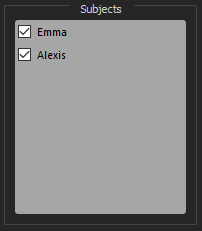
The Subjects Panel lists the current subjects being recorded. A connection to the motion capture software is required and can be configured in the settings. Currently only Vicon and Motive software is are supported.
Marks Panel
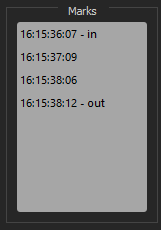
The marks panel shows the marks for the current or last recorded take. Double click to edit or rename marks.
Audio Panel
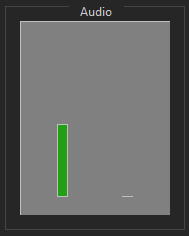
The Audio Panel shows the audio levels from each channel of the selected Audio Device.
Devices Panel
The Devices Panel lists the current devices and their state.
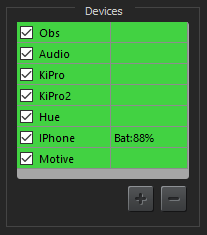
Check boxes enable/disable each device. Disabling a device disconnects that device. A new connection will be made when the device is re-enabled.
Device Status

- Green devices are ready
- Red Devices are recording
- Grey Devices are offline
- Black Devices are in error